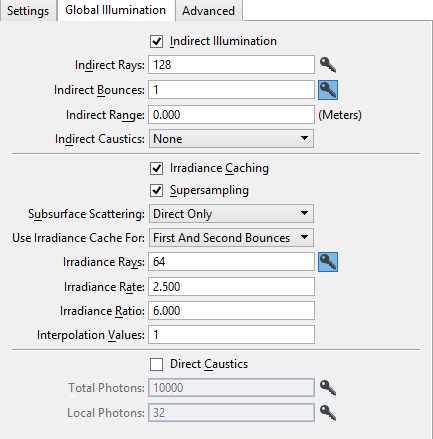
Luxology Render Setup Manager Dialog, Global Illumination Tab
| Setting | Description |
|---|---|
| Indirect Illumination | If enabled (default), indirect lighting is considered. If disabled, the Luxology render results in a ray traced image. By default, when Indirect Illumination is enabled, the Irradiance Caching method for radiosity also is enabled. This means that the Indirect Rays option is disabled in favor of the Irradiance Rays within the Irradiance Caching settings area. |
| Indirect Rays | Sets the number of indirect lighting samples taken for each pixel. The Monte Carlo method, the default, uses a low-quality (fewer rays) sample at every single pixel. Technically, Indirect Rays are the same as Irradiance Rays; however, both settings are available since the two forms of indirect illumination require vastly different numbers of samples. |
| Indirect Rays Key | Is synchronized with the Performance-Quality slide control in the Luxology Render dialog and scales the indirect rays according to the slider. When keyed setting is off, ignores slider adjustment. When keyed setting is on, the slider adjusts value. |
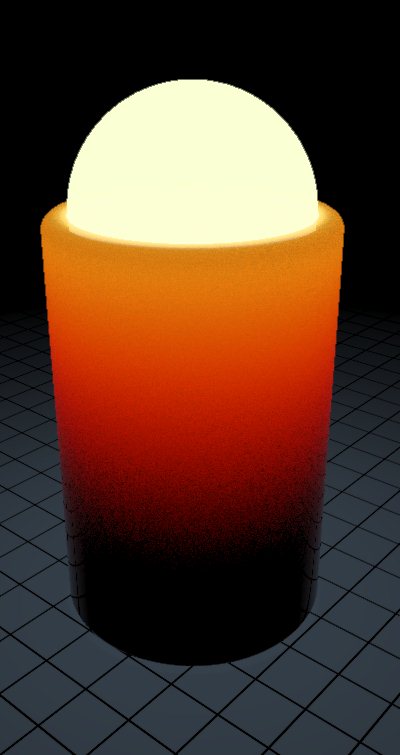
| Indirect Bounces | Sets the number of bounces an indirect ray takes before terminating. The default value of 1 means that a single bounce is used to calculate how a surface’s environment affects it. This is less accurate than a multi-bounce solution, since in the real world, photons bounce all over to illuminate the environment. Using fewer bounces lessens quality but increases performance. By increasing the number of indirect bounces, the Indirect Rays are fired from the initial surface and bounce off the first surface they hit then continue traveling and hitting surfaces until the maximum number of bounces is met. As you add bounces, the number of calculations increase, as does render times. While the result is more accurate, there are naturally occurring diminishing returns in each additional bounce. Adjust your scene with a single bounce and then add additional bounces to see how they impact the end result. For most exterior scenes a single bounce suffices. Interior scenes benefit from additional bounces, but you should rarely need more than 4 or 5. If a scene is mostly illuminated by a single small area of light, adding bounces improves the overall brightness and look of the rendered image. To reduce the number of bounces required, you can increase the Ambient Intensity in the
Animate Global Lighting Settings
tool settings window.
The effect of multiple bounced illumination rays is to simply boost the overall lighting by some averaged color. To save time and yield realistic results, you can reduce the number of bounces and set the Ambient Color and Intensity to mimic those final bounces. |
| Indirect Bounces Key | Is synchronized with the Performance-Quality slide control in the Luxology Render dialog and scales the indirect bounces according to the slider. When keyed setting is off, ignores slider adjustment. When keyed setting is on, the slider adjusts value. |
| Indirect Range | Sets how far an indirect ray can travel before it is terminated. In the case of a ray being terminated due to the indirect range value, it is assumed that the ray would eventually hit the environment background. This is a useful way to optimize render times. Generally, reducing the indirect range improves render speed. However, setting this value too low creates unnatural lighting effects. In these cases, many rays that otherwise would have ultimately hit a geometric surface, resulting in a shadow, may get cut off early. They may illuminate the surface unrealistically, with the backdrop color, rather than shading it with the surrounding geometry. Leaving the value at 0 is similar to setting an infinite value. In other words, rays will not be terminated prior to striking the environment. Another advantage in limiting the range of indirect rays is that, in large complex scenes, a limited Indirect Range allows geometry segments that are off-screen or in already completed buckets, to be flushed from memory more easily. This is because Indirect Rays may be stopped by the limited range before reaching the bounding boxes of those segments. Without being limited, such rays can cause all the polygons in those segments to be brought back into memory. |
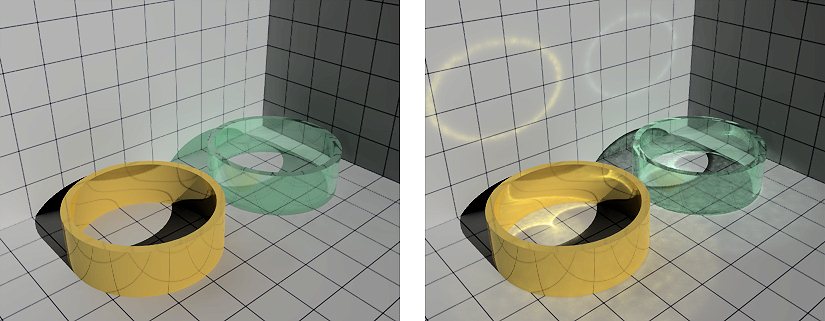
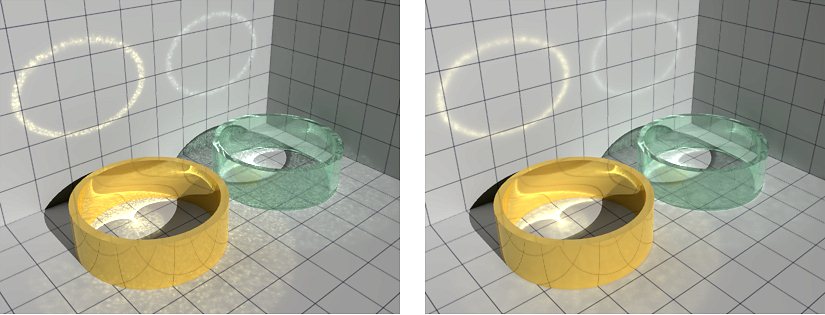
| Indirect Caustics | If enabled, caustic effects from indirect lighting are calculated. Indirect caustic effects are those of light accumulation on a surface after reflecting or refracting from another surface. For example, the light pattern on a table as it is cast through a wine glass. For caustic effects, from indirect illumination, you can select from four options in the menu. |
| Irradiance Caching | If on, stores the indirect illumination for reuse by other pixel samples. Irradiance caching is used for computing global illumination on diffuse surfaces. It addresses the computation of indirect illumination bouncing off one diffuse object onto another. Irradiance caching is used to make this computation fast. The main idea is to perform the indirect illumination sampling only at a selected set of locations in the scene, store the results in a cache, and reuse the cached value at other points through fast interpolation. Irradiance Caching relies on much higher quality samples distributed sparsely across the project whereas Indirect Illumination without Irradiance Caching uses lower quality samples at every pixel. Having two values allows you to easily switch between Irradiance Caching and traditional Indirect Illumination without constantly adjusting the number of rays for each sample. |
| Supersampling | If enabled, additional rays are fired for cells that differ greatly from their neighbors. After all rays have been fired for a particular irradiance evaluation, Supersampling looks at the resulting ray color of each hemisphere cell. It then sends additional rays through the cells that are very different from their neighbors, getting a more detailed look at high contrast areas of the environment, resulting in a more accurate estimate. Currently about 25% more rays are fired, so for a setting of 100 rays, you get 125. The results, however, are better than if you used a setting of 125 without Supersampling because the rays for Supersampling are going in the more important directions. Leave on this option at all times; it improves your render quality with minimal performance impact. |
| Subsurface Scattering | Subsurface scattering is the effect of light bouncing around inside a material and being "tinted" prior to exiting. This is most obvious in materials like marble, wax, or translucent liquids.
With Direct Only enabled, rendered images still can contain effects from both indirect illumination as well as Subsurface Scattering, but the two will not affect each other. This is the default behavior for speed reasons. When either or both of the indirect illumination settings are enabled, indirect illumination rays will be considered when evaluating Subsurface Scattering effects, with a resulting increase in the rendering time.
|
| Use Irradiance Cache For | Allows you to control what layer of rays will use lrradiance Caching during a render and which will use Monte Carlo.
|
| Irradiance Rays | Sets the number of Irradiance Rays that are fired out from the surface in order to sample indirect illumination. Technically, Irradiance Rays are the same as Indirect Rays; however, both settings are available since the two forms of indirect illumination require vastly different numbers of samples. |
| Irradiance Rays Key | Is synchronized with the Performance-Quality slide control in the Luxology Render dialog and scales the irradiance rays according to the slider. When keyed setting is off, ignores slider adjustment. When keyed setting is on, the slider adjusts value. |
| Irradiance Rate | Sets the minimum distance in pixels between irradiance values. That is, the distance between the points on a surface where irradiance is computed and stored in the cache. |
| Irradiance Ratio | Sets the ratio between the minimum spacing (the Irradiance Rate) and the maximum spacing. In most cases, the default of 6.0 is appropriate. For example, you might want minimum spacing of only half a pixel, but still keep a maximum spacing of 15 pixels, so the Irradiance Rate and Irradiance Ratio settings would be 0.5 and 30.0 respectively. |
| Interpolation Values | Sets the minimum for how many nearby values to interpolate. For example, take a case where this value is set to three. If the point being shaded can find only two nearby previously computed values in the cache, then it forces the computation of a new value at the current point. The final irradiance at that point is a blend of all three values. In this way it tends to smooth out the shading. Generally, increasing this value improves render quality at the expense of render time. |
| Direct Caustics | If enabled, Photon Mapping is used to calculate direct caustics in the rendering. The photon count is divided amongst all active 3D lights with a bias based on the power of the light. |
| Total Photons | Sets the total number of photons shot into the scene. |
| Total Photons Key | Is synchronized with the Performance-Quality slide control in the Luxology Render dialog and scales the total photons according to the slider. When keyed setting is off, ignores slider adjustment. When keyed setting is on, the slider adjusts value. |
| Local Photons | Sets the number of local Photons used and indicates the number of photons required for each pixel sampled. When the pixel is rendered, a search along the surface locates the nearest photons up to the local photon count. The default setting of 32 indicates that 32 photons are used for each pixel rendered. |
| Local Photons Key | Is synchronized with the Performance-Quality slide control in the Luxology Render dialog and scales the local photons according to the slider. When keyed setting is off, ignores slider adjustment. When keyed setting is on, the slider adjusts value. |